|
|  |
|
Here you will filnd all the free project directions currently available on this site.
|
|
|
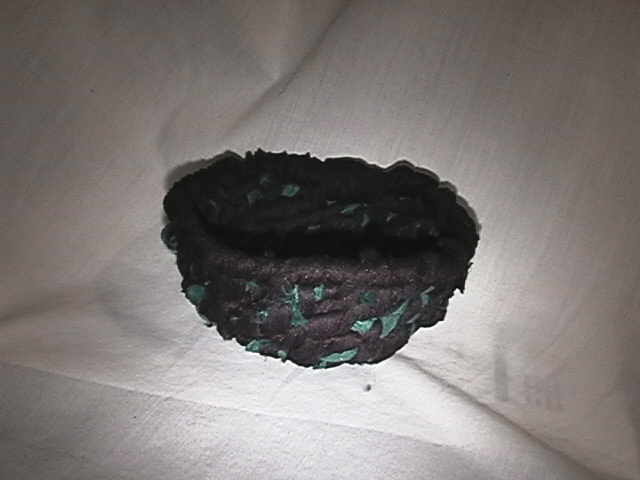
Cloth Baskets
The first step is to choose the right material. Material that is streachy or too heavy are can be used, but are hard to work with. What I like to use best is material from old work shirts, this is a polyester/cotton mix. Tear the cloth into 1 1/2 to 2 inch strips. You can cut the strips if you choose but you will get a slightly different look. The next step in making your basket is to take 3 or 4 strands of cloth and begin twisting them. Continue twisting them until you have about a 1 inch cord. Let the cord circle in on itself so you have a circle formed out of the cord. Then take one of the strands of cloth and wrap it around the cord. Continue twisting the strands to form a cord. When you have 1/2 to 1 inch of cord twisted, take a strand of cloth and wrap it around the previous cord to connect the cords together. Continue twisting strands and connecting the new cord to the previous cord about every 1/2 to 1 inch. You keep doing this, keeping it flat, until you have the base of your basket as large as you want it. The size of your basket is determined by the size of the base. When you have the base as large as you want it, you can start working on the side. You do this by placing the new coil slightly up and out from the previous coil instead of flat beside it. You continue with this as you did with the base of the basketuntil you have the side as high as you want it. When you have the side as high as you want it, finish off by pulling your coils tighter and placing them more on top and toward the inside slightly. You will gradually add fewer strands until you have only 1 left that you wind back in on itself to tie it off. Decorated Jars
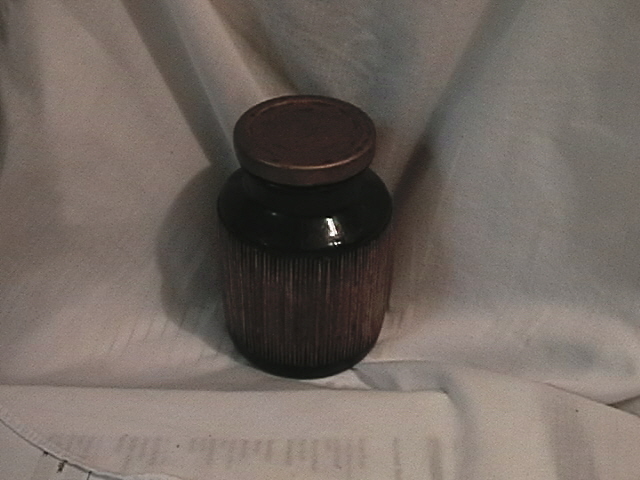
When I made this jar, I began by painting the jar black and the lid gold. Then I glued flat tooth picks all around the jar. After the glue completely dried, I stained the tooth picks. I let the jar dry for 24 hours, then I covered the whole thing with 2 coats of polyurithane.
Other things you might try doing with jars are using rope, beads, or buttons. You can use the jars for so many things, but you could also fill them with wax and a wick and have a one of a kind candle.
|
|
|
| |
|
|
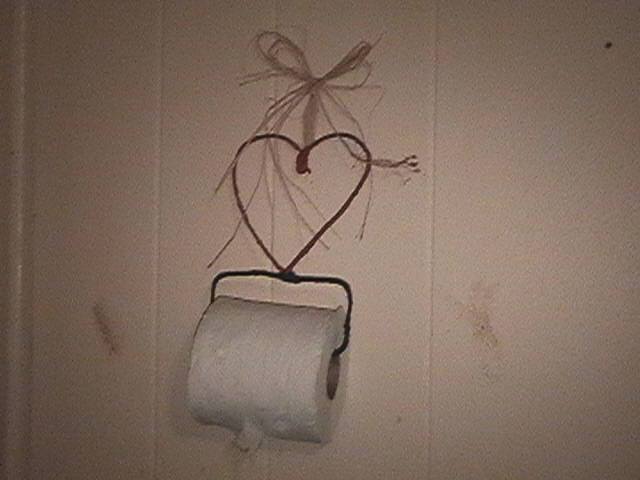
Paper Towel or Toilet Paper Holders
The directions for the toilet paper holder and the paper towel holder are exactly the same. The only difference between them is compensating for the size of the role. You begin by cutting off the top of the hanger. Streighten out the rest and find the center.
Bend the hanger in half. Continue to bend the hanger around until the ends meet each other. When the ends meet, bend them around each other to hold them together. This forms the heart. Use either the toilet paper roll or the paper towel roll to measure where to bend the wire for the roll. Cut off the ends so they reach about 1 1/2 inch inside the roll. Use double sided tape and different color raffia to cover the hanger and to make the bow to hang it with.
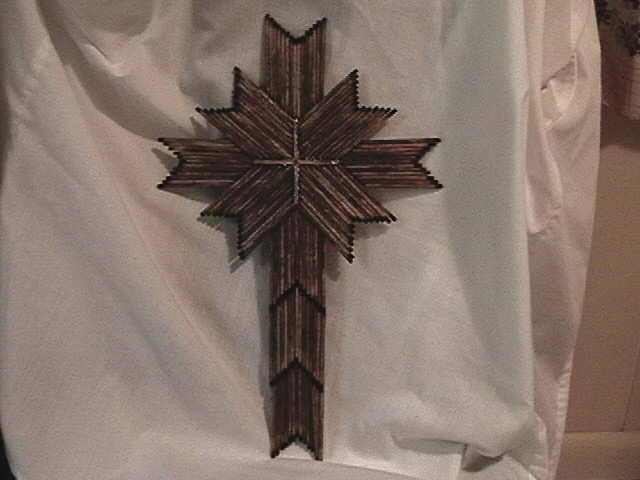
Burnt Match Cross
Start with a peice of thick card board cut in the shape of a cross. You don't have to be exact with the measurements, but this project works best for me when the cross is about 3 or 4 matches long and and 2 match lengths on each side from the center. Then glue a peice of paper around the cardboard to hide the fact that this may have been last nights pizza. If you want the back a different color than the front, then now is the time to paint it.Now your ready to start putting on burnt matches.
Make sure all the burnt sulfer is off the matches so they will lie flat. Start with the 4 center matches. cut them to 3/4 inch long and glue them in the center. After they have dried, continue ti glue in the rest of the tooth picks. Look at the picture of the cross to see the patern of the matches. When the glue is dry, stain or paint the cross to your preferences. Use a bent pop can tab glued to the back as a hanger.
|
|
|
|
|
By the end of October I will be adding 3 more craft projects for you to make or purchase as completed projects or as kits, Just in time for Christmas! They are a sticks and stone lamp, a stone candle holder, and sea shell candles. They are a lot of fun to make and look great when you are finished. Be sure to come back and check it out, and don't forget to tell all your crafty friends about the Crafts, crafts, crafts web site. *************************************************************
|
|
| |